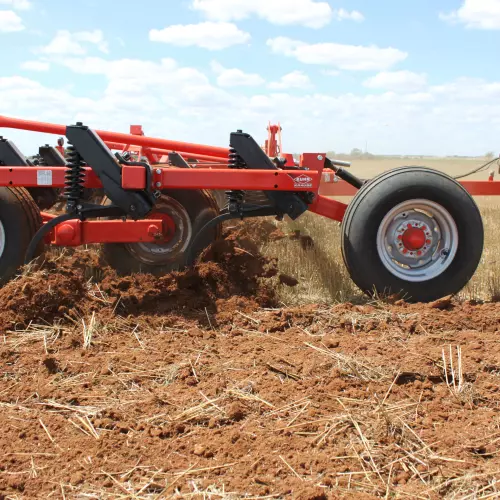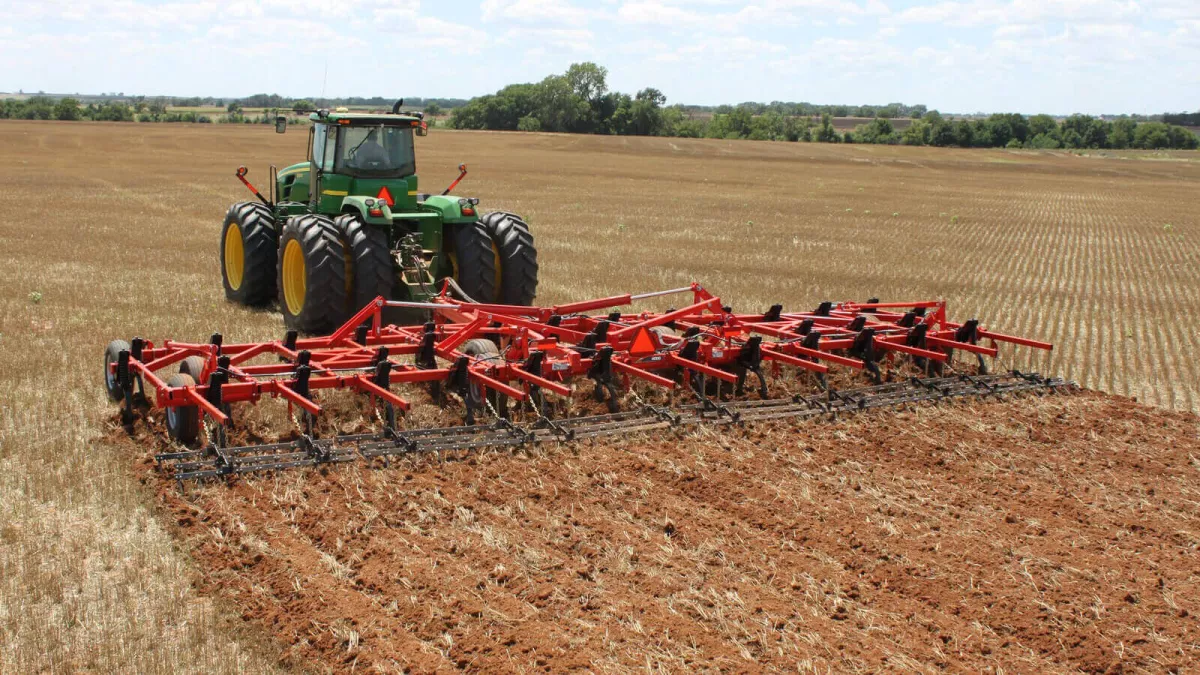
Positive Mechanical Depth Control
Standard on all KUHN Krause 4000 flex-wing chisel plows to ensure even operating depth across the width of the machine.


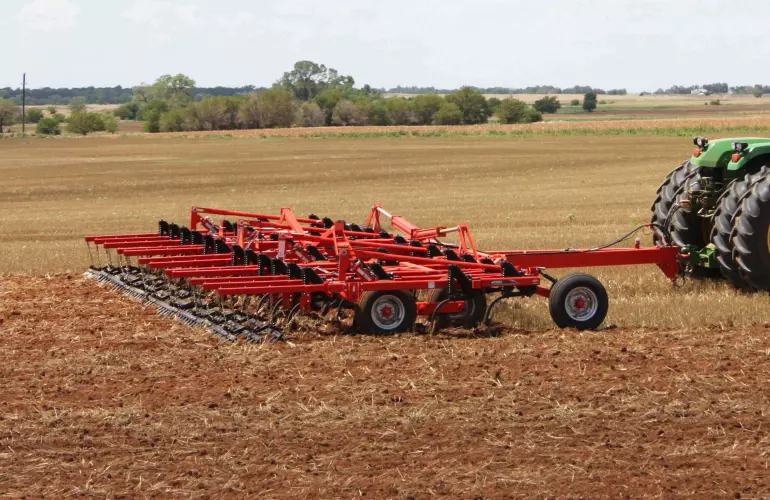
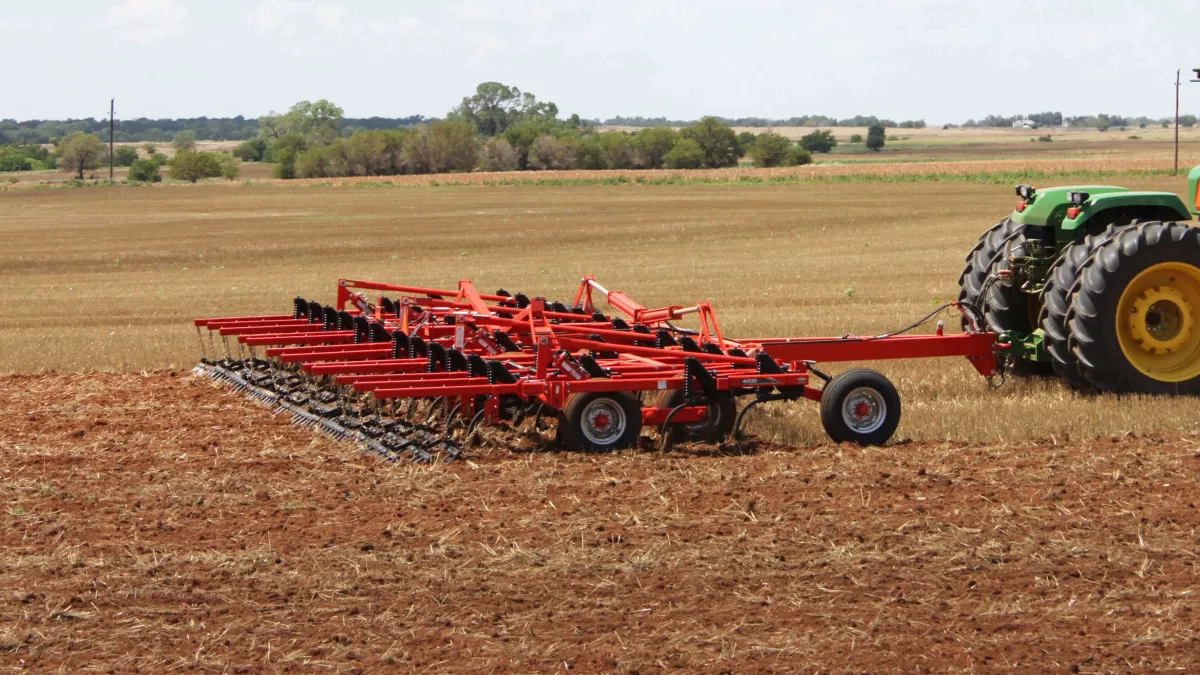
Additional Equipment for the 4000 Chisel Plow

| Transport Width |
|---|
| Transport Height |
| Frame Type |
| Number of Shanks |
| Shank Spacing |
| Working Width at Shanks |
| Weight |
| 4000-17 | 4000-19 | 4000-21 | 4000-23 | 4000-25N | 4000-25W | 4000-27N | 4000-27W | 4000-29 | 4000-31 | 4000-33 | 4000-35 | 4000-37 | 4000-39 |
|---|---|---|---|---|---|---|---|---|---|---|---|---|---|
| 12'9" (3.9 m) | 12'9" (3.9 m) | 12'9" (3.9 m) | 12'9" (3.9 m) | 12'9" (3.9 m) | 18'4" (5.6 m) | 12'9" (3.9 m) | 18'4" (5.6 m) | 18'4" (5.6 m) | 18'4" (5.6 m) | 18'4" (5.6 m) | 18'4" (5.6 m) | 18'4" (5.6 m) | 18'4" (5.6 m) |
| 9'8" (2.9 m) | 10'7" (3.2 m) | 11'9" (3.8 m) | 12'6" (3.8 m) | 13'6" (4.1 m) | 10'10" (3.3 m) | 14'8" (4.5 m) | 11'9" (3.6 m) | 12'9" (3.9 m) | 13'7" (4.1 m) | 14'6" (4.4 m) | 15'6" (4.7 m) | 16'4" (5.0 m) | 17'3" (5.3 m) |
| 3-Section | 3-Section | 3-Section | 3-Section | 3-Section | 3-Section | 3-Section | 3-Section | 3-Section | 3-Section | 3-Section | 3-Section | 3-Section | 3-Section |
| 17 | 19 | 21 | 23 | 25 | 25 | 27 | 27 | 29 | 31 | 33 | 35 | 37 | 39 |
| 12" (30.5 cm) | 12" (30.5 cm) | 12" (30.5 cm) | 12" (30.5 cm) | 12" (30.5 cm) | 12" (30.5 cm) | 12" (30.5 cm) | 12" (30.5 cm) | 12" (30.5 cm) | 12" (30.5 cm) | 12" (30.5 cm) | 12" (30.5 cm) | 12" (30.5 cm) | 12" (30.5 cm) |
| 17' (5.2 m) | 19' (5.8 m) | 21' (6.4 m) | 23' (7.0 m) | 25' (7.6 m) | 25' (7.6 m) | 27' (8.2 m) | 27' (8.2 m) | 29' (8.8 m) | 31' (9.4 m) | 33' (10.1 m) | 35' (10.7 m) | 37' (11.3 m) | 39' (11.9 m) |
| 5,452 lb (2 473 kg) | 5,600 lb (2 540 kg) | 5,714 lb (2 592 kg) | 6,299 lb (2 857 kg) | 6,447 lb (2 924 kg) | 7,456 lb (3 382 kg) | 6,650 lb (3 016 kg) | 7,604 lb (3 449 kg) | 7,817 lb (3 546 kg) | 8,611 lb (3 906 kg) | 8,759 lb (3 973 kg) | 8,972 lb (4 070 kg) | 10,040 lb (4 554 kg) | 10,188 lb (4 621 kg) |
| Hitch Type |
|---|
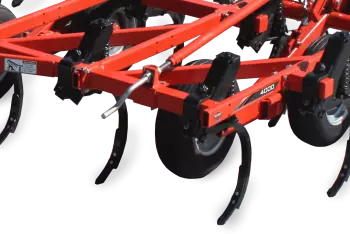
| Positive Mechanical Depth Control Each Section |
| Hydraulics |
| Wing Fold |
| Rigid Clamp Shanks |
| Center Section Wheels |
| Wing Frame Wheels |
| Gauge Wheels |
| Points |
| Safety |
| 4000-17 | 4000-19 | 4000-21 | 4000-23 | 4000-25N | 4000-25W | 4000-27N | 4000-27W | 4000-29 | 4000-31 | 4000-33 | 4000-35 | 4000-37 | 4000-39 |
|---|---|---|---|---|---|---|---|---|---|---|---|---|---|
| CAT IV Cast for 2" Pin | CAT IV Cast for 2" Pin | CAT IV Cast for 2" Pin | CAT IV Cast for 2" Pin | CAT IV Cast for 2" Pin | CAT IV Cast for 2" Pin | CAT IV Cast for 2" Pin | CAT IV Cast for 2" Pin | CAT IV Cast for 2" Pin | CAT IV Cast for 2" Pin | CAT IV Cast for 2" Pin | CAT IV Cast for 2" Pin | CAT IV Cast for 2" Pin | CAT IV Cast for 2" Pin |
| Center Section: (2) 4" x 8" Cylinders each Wing Section: (1) 3-¾" x 8" Cylinder | Center Section: (2) 4" x 8" Cylinders each Wing Section: (1) 3-¾" x 8" Cylinder | Center Section: (2) 4" x 8" Cylinders each Wing Section: (1) 3-¾" x 8" Cylinder | Center Section: (2) 4" x 8" Cylinders each Wing Section: (1) 3-¾" x 8" Cylinder | Center Section: (2) 4" x 8" Cylinders each Wing Section: (1) 3-¾" x 8" Cylinder | Center Section: (2) 4-¼" x 8" Cylinders Each Wing Section: (1) 4" x 8" Cylinder | Center Section: (2) 4" x 8" Cylinders each Wing Section: (1) 3-¾" x 8" Cylinder | Center Section: (2) 4-¼" x 8" Cylinders each Wing Section: (1) 4" x 8" Cylinder | Center Section: (2) 4-¼" x 8" Cylinders each Wing Section: (1) 4" x 8" Cylinder | Center Section: (2) 4-¼" x 8" Cylinders each Wing Section: (1) 4" x 8" Cylinder | Center Section: (2) 4-¼" x 8" Cylinders each Wing Section: (1) 4" x 8" Cylinder | Center Section: (2) 4-¼" x 8" Cylinders each Wing Section: (1) 4" x 8" Cylinder | Center Section: (2) 4-¼" x 8" Cylinders each Wing Section: (1) 4" x 8" Cylinder | Center Section: (2) 4-¼" x 8" Cylinders each Wing Section: (1) 4" x 8" Cylinder |
| Color-Coded Hose Grips, Male ISO Couplers on Hydraulic Hoses | Color-Coded Hose Grips, Male ISO Couplers on Hydraulic Hoses | Color-Coded Hose Grips, Male ISO Couplers on Hydraulic Hoses | Color-Coded Hose Grips, Male ISO Couplers on Hydraulic Hoses | Color-Coded Hose Grips, Male ISO Couplers on Hydraulic Hoses | Color Coded Hose Grips, Male ISO Couplers on Hydraulic Hoses | Color-Coded Hose Grips, Male ISO Couplers on Hydraulic Hoses | Color-Coded Hose Grips, Male ISO Couplers on Hydraulic Hoses | Color-Coded Hose Grips, Male ISO Couplers on Hydraulic Hoses | Color-Coded Hose Grips, Male ISO Couplers on Hydraulic Hoses | Color-Coded Hose Grips, Male ISO Couplers on Hydraulic Hoses | Color-Coded Hose Grips, Male ISO Couplers on Hydraulic Hoses | Color-Coded Hose Grips, Male ISO Couplers on Hydraulic Hoses | Color-Coded Hose Grips, Male ISO Couplers on Hydraulic Hoses |
| (2) 4-½" x 16" Cylinders | (2) 4-½" x 16" Cylinders | (2) 4-½" x 16" Cylinders | (2) 4-½" x 16" Cylinders | (2) 4-½" x 16" Cylinders | (2) 4-½" x 16" Cylinders | (2) 4-½" x 16" Cylinders | (2) 4-½" x 16" Cylinders | (2) 4-½" x 16" Cylinders | (2) 4-½" x 16" Cylinders | (2) 4-½" x 16" Cylinders | (2) 4-½" x 16" Cylinders | (2) 4-½" x 16" Cylinders | (2) 4-½" x 16" Cylinders |
| 10" Maximum Working Depth, 30" Underframe Clearance, 1-¼" x 2" x 30" Shanks | 10" Maximum Working Depth, 30" Underframe Clearance, 1-¼" x 2" x 30" Shanks | 10" Maximum Working Depth, 30" Underframe Clearance, 1-¼" x 2" x 30" Shanks | 10" Maximum Working Depth, 30" Underframe Clearance, 1-¼" x 2" x 30" Shanks | 10" Maximum Working Depth, 30" Underframe Clearance, 1-¼" x 2" x 30" Shanks | 10" Maximum Working Depth, 30" Underframe Clearance, 1-¼" x 2" x 30" Shanks | 10" Maximum Working Depth, 30" Underframe Clearance, 1-¼" x 2" x 30" Shanks | 10" Maximum Working Depth, 30" Underframe Clearance, 1-¼" x 2" x 30" Shanks | 10" Maximum Working Depth, 30" Underframe Clearance, 1-¼" x 2" x 30" Shanks | 10" Maximum Working Depth, 30" Underframe Clearance, 1-¼" x 2" x 30" Shanks | 10" Maximum Working Depth, 30" Underframe Clearance, 1-¼" x 2" x 30" Shanks | 10" Maximum Working Depth, 30" Underframe Clearance, 1-¼" x 2" x 30" Shanks | 10" Maximum Working Depth, 30" Underframe Clearance, 1-¼" x 2" x 30" Shanks | 10" Maximum Working Depth, 30" Underframe Clearance, 1-¼" x 2" x 30" Shanks |
| (4) 240/80R15 Tires, Dual Walking Beams, 6-Bolt Heavy-Duty Hubs | (4) 240/80R15 Tires, Dual Walking Beams, 6-Bolt Heavy-Duty Hubs | (4) 240/80R15 Tires, Dual Walking Beams, 6-Bolt Heavy-Duty Hubs | (4) 240/80R15 Tires, Dual Walking Beams, 6-Bolt Heavy-Duty Hubs | (4) 240/80R15 Tires, Dual Walking Beams, 6-Bolt Heavy-Duty Hubs | (4) 280/70R15 Tires, Dual Walking Beams, 6-Bolt Heavy-Duty Hubs | (4) 240/80R15 Tires, Dual Walking Beams, 6-Bolt Heavy-Duty Hubs | (4) 280/70R15 Tires, Dual Walking Beams, 6-Bolt Heavy-Duty Hubs | (4) 280/70R15 Tires, Dual Walking Beams, 6-Bolt Heavy-Duty Hubs | (4) 280/70R15 Tires, Dual Walking Beams, 6-Bolt Heavy-Duty Hubs | (4) 280/70R15 Tires, Dual Walking Beams, 6-Bolt Heavy-Duty Hubs | (4) 280/70R15 Tires, Dual Walking Beams, 6-Bolt Heavy-Duty Hubs | (4) 280/70R15 Tires, Dual Walking Beams, 6-Bolt Heavy-Duty Hubs | (4) 280/70R15 Tires, Dual Walking Beams, 6-Bolt Heavy-Duty Hubs |
| (1) 280/70R15 Tire, Single per Wing, 6-Bolt Heavy-Duty Hubs | (1) 280/70R15 Tire, Single per Wing, 6-Bolt Heavy-Duty Hubs | (1) 280/70R15 Tire, Single per Wing, 6-Bolt Heavy-Duty Hubs | (2) 240/80R15 Tires, Walking Beam per Wing, 6-Bolt Heavy-Duty Hubs | (2) 240/80R15 Tires, Walking Beam per Wing, 6-Bolt Heavy-Duty Hubs | (2) 240/80R15 Tires, Walking Beam per Wing, 6-Bolt Heavy-Duty Hubs | (2) 240/80R15 Tires, Walking Beam per Wing, 6-Bolt Heavy-Duty Hubs | (2) 240/80R15 Tires, Walking Beam per Wing, 6-Bolt Heavy-Duty Hubs | (2) 240/80R15 Tires, Walking Beam per Wing, 6-Bolt Heavy-Duty Hubs | (2) 240/80R15 Tires, Walking Beam per Wing, 6-Bolt Heavy-Duty Hubs | (2) 240/80R15 Tires, Walking Beam per Wing, 6-Bolt Heavy-Duty Hubs | (2) 240/80R15 Tires, Walking Beam per Wing, 6-Bolt Heavy-Duty Hubs | (2) 240/80R15 Tires, Walking Beam per Wing, 6-Bolt Heavy-Duty Hubs | (2) 240/80R15 Tires, Walking Beam per Wing, 6-Bolt Heavy-Duty Hubs |
| Not Applicable | Not Applicable | Not Applicable | Not Applicable | Not Applicable | Not Applicable | Not Applicable | Not Applicable | Not Applicable | Not Applicable | Not Applicable | Not Applicable | Manual Adjust, Single 240/80R15 Tire and 6-Bolt Heavy-Duty Hub per Wing | Manual Adjust, Single 240/80R15 Tire and 6-Bolt Heavy-Duty Hub per Wing |
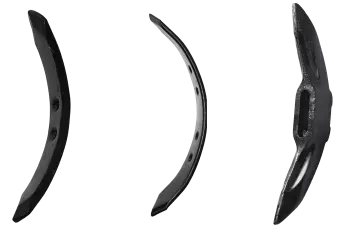
| 2" Reversible Straight Steel Chisel Point | 2" Reversible Straight Steel Chisel Point | 2" Reversible Straight Steel Chisel Point | 2" Reversible Straight Steel Chisel Point | 2" Reversible Straight Steel Chisel Point | 2" Reversible Straight Steel Chisel Point | 2" Reversible Straight Steel Chisel Point | 2" Reversible Straight Steel Chisel Point | 2" Reversible Straight Steel Chisel Point | 2" Reversible Straight Steel Chisel Point | 2" Reversible Straight Steel Chisel Point | 2" Reversible Straight Steel Chisel Point | 2" Reversible Straight Steel Chisel Point | 2" Reversible Straight Steel Chisel Point |
| Tongue Jack, Slow Moving Vehicle Sign, High Visibility LED Transport Light Kit, Safety Chain | Tongue Jack, Slow Moving Vehicle Sign, High Visibility LED Transport Light Kit, Safety Chain | Tongue Jack, Slow Moving Vehicle Sign, High Visibility LED Transport Light Kit, Safety Chain | Tongue Jack, Slow Moving Vehicle Sign, High Visibility LED Transport Light Kit, Safety Chain | Tongue Jack, Slow Moving Vehicle Sign, High Visibility LED Transport Light Kit, Safety Chain | Tongue Jack, Slow Moving Vehicle Sign, High Visibility LED Transport Light Kit, Safety Chain | Tongue Jack, Slow Moving Vehicle Sign, High Visibility LED Transport Light Kit, Safety Chain | Tongue Jack, Slow Moving Vehicle Sign, High Visibility LED Transport Light Kit, Safety Chain | Tongue Jack, Slow Moving Vehicle Sign, High Visibility LED Transport Light Kit, Safety Chain | Tongue Jack, Slow Moving Vehicle Sign, High Visibility LED Transport Light Kit, Safety Chain | Tongue Jack, Slow Moving Vehicle Sign, High Visibility LED Transport Light Kit, Safety Chain | Tongue Jack, Slow Moving Vehicle Sign, High Visibility LED Transport Light Kit, Safety Chain | Tongue Jack, Slow Moving Vehicle Sign, High Visibility LED Transport Light Kit, Safety Chain | Tongue Jack, Slow Moving Vehicle Sign, High Visibility LED Transport Light Kit, Safety Chain |
| Shanks |
|---|
| Shanks |
| Wing Frame Wheels |
| Gauge Wheels |
| Points |
| Points |
| Points |
| Harrows |
| Harrows |
| Rear Hitch |
| Rear Hitch |
| 4000-17 | 4000-19 | 4000-21 | 4000-23 | 4000-25N | 4000-25W | 4000-27N | 4000-27W | 4000-29 | 4000-31 | 4000-33 | 4000-35 | 4000-37 | 4000-39 |
|---|---|---|---|---|---|---|---|---|---|---|---|---|---|
| 12" Maximum Working Depth, 32" Underframe Clearance 1-¼" x 2-½" x 32" Shanks | 12" Maximum Working Depth, 32" Underframe Clearance 1-¼" x 2-½" x 32" Shanks | 12" Maximum Working Depth, 32" Underframe Clearance 1-¼" x 2-½" x 32" Shanks | 12" Maximum Working Depth, 32" Underframe Clearance 1-¼" x 2-½" x 32" Shanks | 12" Maximum Working Depth, 32" Underframe Clearance 1-¼" x 2-½" x 32" Shanks | 12" Maximum Working Depth, 32" Underframe Clearance 1-¼" x 2-½" x 32" Shanks | 12" Maximum Working Depth, 32" Underframe Clearance 1-¼" x 2-½" x 32" Shanks | 12" Maximum Working Depth, 32" Underframe Clearance 1-¼" x 2-½" x 32" Shanks | 12" Maximum Working Depth, 32" Underframe Clearance 1-¼" x 2-½" x 32" Shanks | 12" Maximum Working Depth, 32" Underframe Clearance 1-¼" x 2-½" x 32" Shanks | 12" Maximum Working Depth, 32" Underframe Clearance 1-¼" x 2-½" x 32" Shanks | 12" Maximum Working Depth, 32" Underframe Clearance 1-¼" x 2-½" x 32" Shanks | 12" Maximum Working Depth, 32" Underframe Clearance 1-¼" x 2-½" x 32" Shanks | 12" Maximum Working Depth, 32" Underframe Clearance 1-¼" x 2-½" x 32" Shanks |
| 600 lb Point Load, 12" Maximum Working Depth, 9" Trip Height, 32" Underframe Clearance, 1-¼" x 2" x 26" Shanks | 600 lb Point Load, 12" Maximum Working Depth, 9" Trip Height, 32" Underframe Clearance, 1-¼" x 2" x 26" Shanks | 600 lb Point Load, 12" Maximum Working Depth, 9" Trip Height, 32" Underframe Clearance, 1-¼" x 2" x 26" Shanks | 600 lb Point Load, 12" Maximum Working Depth, 9" Trip Height, 32" Underframe Clearance, 1-¼" x 2" x 26" Shanks | 600 lb Point Load, 12" Maximum Working Depth, 9" Trip Height, 32" Underframe Clearance, 1-¼" x 2" x 26" Shanks | 600 lb Point Load, 12" Maximum Working Depth, 9" Trip Height, 32" Underframe Clearance, 1-¼" x 2" x 26" Shanks | 600 lb Point Load, 12" Maximum Working Depth, 9" Trip Height, 32" Underframe Clearance, 1-¼" x 2" x 26" Shanks | 600 lb Point Load, 12" Maximum Working Depth, 9" Trip Height, 32" Underframe Clearance, 1-¼" x 2" x 26" Shanks | 600 lb Point Load, 12" Maximum Working Depth, 9" Trip Height, 32" Underframe Clearance, 1-¼" x 2" x 26" Shanks | 600 lb Point Load, 12" Maximum Working Depth, 9" Trip Height, 32" Underframe Clearance, 1-¼" x 2" x 26" Shanks | 600 lb Point Load, 12" Maximum Working Depth, 9" Trip Height, 32" Underframe Clearance, 1-¼" x 2" x 26" Shanks | 600 lb Point Load, 12" Maximum Working Depth, 9" Trip Height, 32" Underframe Clearance, 1-¼" x 2" x 26" Shanks | 600 lb Point Load, 12" Maximum Working Depth, 9" Trip Height, 32" Underframe Clearance, 1-¼" x 2" x 26" Shanks | 600 lb Point Load, 12" Maximum Working Depth, 9" Trip Height, 32" Underframe Clearance, 1-¼" x 2" x 26" Shanks |
| (2) 240/80R15 Tires, Walking Beam per Wing, 6-Bolt Heavy-Duty Hubs | (2) 240/80R15 Tires, Walking Beam per Wing, 6-Bolt Heavy-Duty Hubs | (2) 240/80R15 Tires, Walking Beam per Wing, 6-Bolt Heavy-Duty Hubs | (1) 280/70R15 Tires per Wing, 6-Bolt Heavy-Duty Hubs | (1) 280/70R15 Tires per Wing, 6-Bolt Heavy-Duty Hubs | (1) 280/70R15 Tires per Wing, 6-Bolt Heavy-Duty Hubs | (1) 280/70R15 Tires per Wing, 6-Bolt Heavy-Duty Hubs | (1) 280/70R15 Tires per Wing, 6-Bolt Heavy-Duty Hubs | (1) 280/70R15 Tires per Wing, 6-Bolt Heavy-Duty Hubs | Not Applicable | Not Applicable | Not Applicable | Not Applicable | Not Applicable |
| Not Applicable | Not Applicable | Manual Adjust, Single 240/80R15 Tire and 6-Bolt Heavy-Duty Hub per Wing | Manual Adjust, Single 240/80R15 Tire and 6-Bolt Heavy-Duty Hub per Wing | Manual Adjust, Single 240/80R15 Tire and 6-Bolt Heavy-Duty Hub per Wing | Not Applicable | Manual Adjust, Single 240/80R15 Tire and 6-Bolt Heavy-Duty Hub per Wing | Not Applicable | Not Applicable | Manual Adjust, Single 240/80R15 Tire and 6-Bolt Heavy-Duty Hub per Wing | Manual Adjust, Single 240/80R15 Tire and 6-Bolt Heavy-Duty Hub per Wing | Manual Adjust, Single 240/80R15 Tire and 6-Bolt Heavy-Duty Hub per Wing | Not Applicable | Not Applicable |
| None | None | None | None | None | None | None | None | None | None | None | None | None | None |
| Double K® 2" Reversible Cast Chromium Carbide Chisel Point | Double K® 2" Reversible Cast Chromium Carbide Chisel Point | Double K® 2" Reversible Cast Chromium Carbide Chisel Point | Double K® 2" Reversible Cast Chromium Carbide Chisel Point | Double K® 2" Reversible Cast Chromium Carbide Chisel Point | Double K® 2" Reversible Cast Chromium Carbide Chisel Point | Double K® 2" Reversible Cast Chromium Carbide Chisel Point | Double K®2" Reversible Cast Chromium Carbide Chisel Point | Double K® 2" Reversible Cast Chromium Carbide Chisel Point | Double K® 2" Reversible Cast Chromium Carbide Chisel Point | Double K® 2" Reversible Cast Chromium Carbide Chisel Point | Double K® 2" Reversible Cast Chromium Carbide Chisel Point | Double K® 2" Reversible Cast Chromium Carbide Chisel Point | Double K® 2" Reversible Cast Chromium Carbide Chisel Point |
| 3" Twisted Shovel Point | 3" Twisted Shovel Point | 3" Twisted Shovel Point | 3" Twisted Shovel Point | 3" Twisted Shovel Point | 3" Twisted Shovel Point | 3" Twisted Shovel Point | 3" Twisted Shovel Point | 3" Twisted Shovel Point | 3" Twisted Shovel Point | 3" Twisted Shovel Point | 3" Twisted Shovel Point | 3" Twisted Shovel Point | 3" Twisted Shovel Point |
| 3-Row Spike Harrow | 3-Row Spike Harrow | 3-Row Spike Harrow | 3-Row Spike Harrow | 3-Row Spike Harrow | 3-Row Spike Harrow | 3-Row Spike Harrow | 3-Row Spike Harrow | 3-Row Spike Harrow | 3-Row Spike Harrow | 3-Row Spike Harrow | 3-Row Spike Harrow | 3-Row Spike Harrow | 3-Row Spike Harrow |
| 5-Row Spike Harrow | 5-Row Spike Harrow | 5-Row Spike Harrow | 5-Row Spike Harrow | 5-Row Spike Harrow | 5-Row Spike Harrow | 5-Row Spike Harrow | 5-Row Spike Harrow | 5-Row Spike Harrow | 5-Row Spike Harrow | 5-Row Spike Harrow | 5-Row Spike Harrow | 5-Row Spike Harrow | 5-Row Spike Harrow |
| Standard Rear Hitch for Use without Harrow Attachment | Standard Rear Hitch for Use without Harrow Attachment | Standard Rear Hitch for Use without Harrow Attachment | Standard Rear Hitch for Use without Harrow Attachment | Standard Rear Hitch for Use without Harrow Attachment | Standard Rear Hitch for Use without Harrow Attachment | Standard Rear Hitch for Use without Harrow Attachment | Standard Rear Hitch for Use without Harrow Attachment | Standard Rear Hitch for Use without Harrow Attachment | Standard Rear Hitch for Use without Harrow Attachment | Standard Rear Hitch for Use without Harrow Attachment | Standard Rear Hitch for Use without Harrow Attachment | Standard Rear Hitch for Use without Harrow Attachment | Standard Rear Hitch for Use without Harrow Attachment |
| Extended Rear Hitch for Use with Harrow Attachment | Extended Rear Hitch for Use with Harrow Attachment | Extended Rear Hitch for Use with Harrow Attachment | Extended Rear Hitch for Use with Harrow Attachment | Extended Rear Hitch for Use with Harrow Attachment | Extended Rear Hitch for Use with Harrow Attachment | Extended Rear Hitch for Use with Harrow Attachment | Extended Rear Hitch for Use with Harrow Attachment | Extended Rear Hitch for Use with Harrow Attachment | Extended Rear Hitch for Use with Harrow Attachment | Extended Rear Hitch for Use with Harrow Attachment | Extended Rear Hitch for Use with Harrow Attachment | Extended Rear Hitch for Use with Harrow Attachment | Extended Rear Hitch for Use with Harrow Attachment |
| Recommended Operating Speed |
|---|
| Working Depth Range |
| Recommended Tractor Power |
| 4000-17 | 4000-19 | 4000-21 | 4000-23 | 4000-25N | 4000-25W | 4000-27N | 4000-27W | 4000-29 | 4000-31 | 4000-33 | 4000-35 | 4000-37 | 4000-39 |
|---|---|---|---|---|---|---|---|---|---|---|---|---|---|
| 4 - 7 mph (6 - 11 km/h) | 4 - 7 mph (6 - 11 km/h) | 4 - 7 mph (6 - 11 km/h) | 4 - 7 mph (6 - 11 km/h) | 4 - 7 mph (6 - 11 km/h) | 4 - 7 mph (6 - 11 km/h) | 4 - 7 mph (6 - 11 km/h) | 4 - 7 mph (6 - 11 km/h) | 4 - 7 mph (6 - 11 km/h) | 4 - 7 mph (6 - 11 km/h) | 4 - 7 mph (6 - 11 km/h) | 4 - 7 mph (6 - 11 km/h) | 4 - 7 mph (6 - 11 km/h) | 4 - 7 mph (6 - 11 km/h) |
| 6" - 10" (15.2 - 25.4 cm) | 6" - 10" (15.2 - 25.4 cm) | 6" - 10" (15.2 - 25.4 cm) | 6" - 10" (15.2 - 25.4 cm) | 6" - 10" (15.2 - 25.4 cm) | 6" - 10" (15.2 - 25.4 cm) | 6" - 10" (15.2 - 25.4 cm) | 6" - 10" (15.2 - 25.4 cm) | 6" - 10" (15.2 - 25.4 cm) | 6" - 10" (15.2 - 25.4 cm) | 6" - 10" (15.2 - 25.4 cm) | 6" - 10" (15.2 - 25.4 cm) | 6" - 10" (15.2 - 25.4 cm) | 6" - 10" (15.2 - 25.4 cm) |
| 8 - 12 ENG HP/shank (6 - 9 kW/shank) | 8 - 12 ENG HP/shank (6 - 9 kW/shank) | 8 - 12 ENG HP/shank (6 - 9 kW/shank) | 8 - 12 ENG HP/shank (6 - 9 kW/shank) | 8 - 12 ENG HP/shank (6 - 9 kW/shank) | 8 - 12 ENG HP/shank (6 - 9 kW/shank) | 8 - 12 ENG HP/shank (6 - 9 kW/shank) | 8 - 12 ENG HP/shank (6 - 9 kW/shank) | 8 - 12 ENG HP/shank (6 - 9 kW/shank) | 8 - 12 ENG HP/shank (6 - 9 kW/shank) | 8 - 12 ENG HP/shank (6 - 9 kW/shank) | 8 - 12 ENG HP/shank (6 - 9 kW/shank) | 8 - 12 ENG HP/shank (6 - 9 kW/shank) | 8 - 12 ENG HP/shank (6 - 9 kW/shank) |